Install LAMP+WordPress On Rocky Linux 9
WordPress offers flexibility and ease when it comes to building websites. LAMP which is the acronym for Linux, Apache (aka httpd), Mariadb and PHP provides the framework as well as web server for hosting and running WordPress sites. While WordPress is available for some Stacks other than LAMP, LAMP brings enterprise-class capabilities such as speed, scalability, stability, security, multi-site and more to web and application development.
Given its capabilities, we will discuss the setup of LAMP and WordPress in this post to help you easily deploy WordPress on Rocky Linux 9, an RHEL-based Linux distro. The method used in this step-by-step guide can be replicated on other RHEL-based systems to quickly set up wordpress. Let’s get started.
Step 1. Configure WordPress Domain on Linux
Edit /etc/hosts
vim /etc/hosts

Edit /etc/hostname
vim /etc/hostname

Step 2. Install LAMP On Rocky Linux 9
Installing LAMP basically means installing Linux, Apache, Mariadb and PHP. Assuming you have Rocky Linux 9 installed, you need to install and set up Apache web server, set up Mariadb for database and lastly install PHP for scripting. These are all required for WordPress. To install these packages we need to first update our system as well as package repositories in order to get latest version of packages. For that run the following command:
yum update
Install Apache Web Server (httpd) on Rocky Linux 9
The following command install Apache Web server and verify its status on Rocky Linux 9:
yum install httpd -y && systemctl status httpd
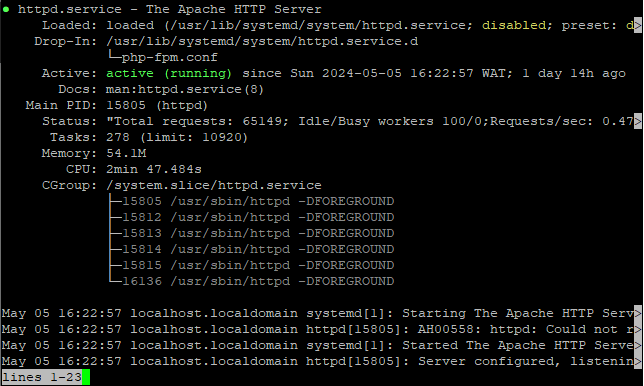
You should see the following output if Apache service is running

Otherwise, issue the following command to start Apache service:
systemctl start httpd
systemctl enable httpd
systemctl status httpd
Configure SELinux And Firewall
Set up firewall rules and configure SELinux to allow http services so that apache website is accessible:
SELinux Configuration
Set up SELinux to grant temporary access. This doesn’t persist upon reboot. Check how to configure SEOLinux and set it to permanently allow specific services.
setenforce 0 gentenforce

Firewall Configuration
firewall-cmd –permanent –add-service=http firewall-cmd –permanent –add-service=https firewall-cmd –reload
Install Mariadb on Rocky Linux 9
Now that we have Apache installed and running let’s move on to installing Mariadb and setting up the database for WordPress. To install Mariadb package, issue the following command:
yum install mariadb-server -y
Run the following commands to start, enable and verify mariadb server:
systemctl start mariadb
systemctl enable mariadb
systemctl status mariadb
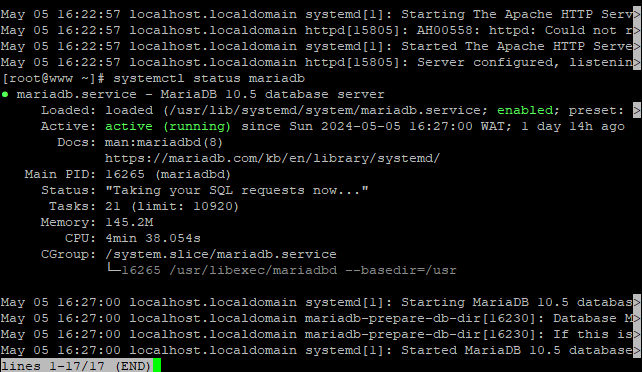
You should get the following output when you run systemctl status mariadb to verify status:

Configure Mariadb Security
Run the following command to secure mariadb or database. The command says looks synonymous to MySQL. But don’t worry. It works pretty fine. Mariadb is a replacement for MySQL in the LAMP Stack.
mysql_secure_installation
The process is fairly simple and self explanatory. While configuring security for database server, you can decide whether to set up database root password or ignore it. Read more about it to understand some of the security parameters to be configured.
Step 3: Create Database For WordPress
Now that mariadb is set up, we can create the database for our WordPress website. Run the following command to access the mariadb commandline where you can manage databases. You should have provide the mariadb user password in case you set one during security setup. Otherwise you should find yourself in the commandline upon running the following command:
mariadb

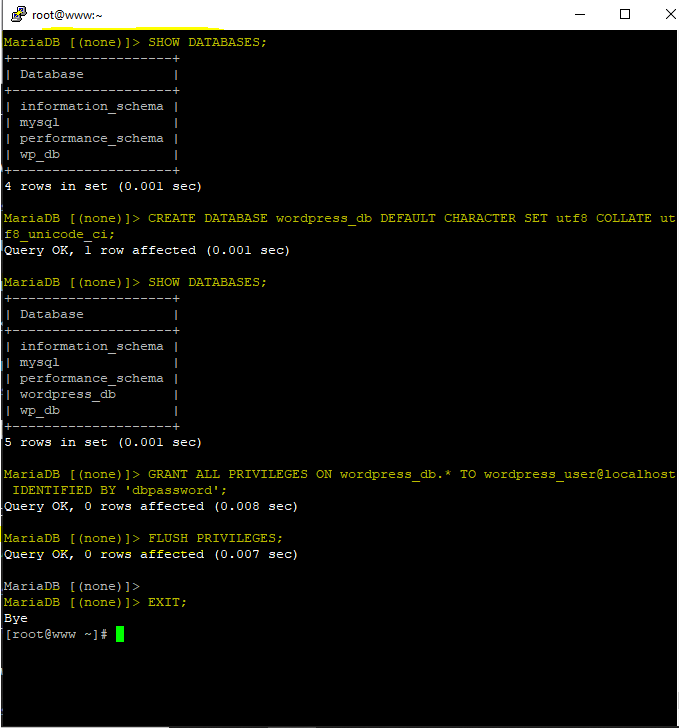
The close bracket and greater than sign shows that we are now in mariadb database management environment. Let’s check existing databases, create one for wordpress, create a user for the database, grant the newly created database access to the user and flush privileges to the user:
CREATE DATABASE wordpress_db DEFAULT CHARACTER SET utf8 COLLATE utf8_unicode_ci;
SHOW DATABASES;
GRANT ALL PRIVILEGES ON wordpress_db.* TO wordpress_user@localhost IDENTIFIED BY ‘dbpassword’;
FLUSH PRIVILEGES;
EXIT;

Install PHP On Rocky Linux
For PHP, we need to install the PHP package PHP extensions required for LAMP and WordPress setup on Rocky Linux 9. Execute the following command to install PHP and its extensions:
yum install php php-gd php-mbstring php-xml php-mysqlnd -y
The close bracket and greater than signs indicate you are in mariadb commandline.
systemctl restart httpd && systemctl status httpd

Step 4. Set Up WordPress On Rocky Linux
To set up WordPress, we have to download the latest version which is a tar G-zipped file and install it. We need the wget tool to download WordPress. It is not included in Rocky Linux Minimal Install which is the preferred setup for server. Check to see if wget is avaialble:
rpm -qa | grep -i wget

Run the following command to install it is not available
yum install wget -y
Use wget to download the latest version of Wordpres:
wget https://wordpress.org/latest.tar.gz
To install WordPress, we have to untar and unzip the downloaded tar g-zipped file. For that do the following:
tar -zxvf latest.tar.gz
Move WordPress to Apache or web server directory
mv wordpress/* /home/penguint/bitscentric.com/
Set proper permissions on wordpress folder so that apache web server has access to it:
chown -R apache:apache /home/penguint/bitscentric.com/wordpress
chmod -R 755 /home/penguint/bitscentric.com/wordpress
ll /home/penguint/bitscentric.com/wordpress
Step 5. Configure WordPress
Create the configuration file for WordPress from the sample file bundled with WordPress.
mv /home/penguint/bitscentric.com/wp-config-sample.php wp-config.php
Edit the file and change the parameters for WordPress database to match the details of the WordPress database (wordpress_db) we created in step 3.
vim /home/penguint/bitscentric.com/wp-config.php
Modify the following lines in the file:
define (‘DB_NAME’, ‘wordpress_db’);
define (‘DB_USER’, ‘wordpress_user’);
define (‘DB_PASSWORD’, ‘dbpassword’);
Step 5. Access And Set Up Your WordPress Website
Login To WordPress
Go to browser and type <server-IP-address>/wp-admin to login to wordpress and manage your website. Note that you will need to complete wordpress initial setup, providing your website details, setting up the user to manage website and providing the database details you used to create wordpress_db database. That’s it.
