
How to Install Tomcat 11 on Ubuntu 22.04
Apache Tomcat, often simply called Tomcat, is an open-source web server and servlet container designed for deploying Java-based applications. It’s lightweight, easy to use, and backed by a strong community, making it a popular choice for developers. Many large-scale web applications rely on Tomcat for its reliability and performance. Plus, integrating Apache can enhance your website’s speed and overall hosting experience.
Apache Tomcat is an open-source web server and servlet container designed to run Java applications. It supports Jakarta Servlet, Jakarta Server Pages, and other key technologies from the Jakarta EE platform, making it a popular choice for deploying Java-based web applications.
Installing Tomcat
You’ll start by downloading the latest version and setting it up with a dedicated user and the right permissions. Additionally, you’ll install the Java Development Kit (JDK).
For security reasons, Tomcat should run under a separate, unprivileged user. To create a user named tomcat, use the following command.
Setting the default shell for the Tomcat user to /bin/false prevents anyone from logging in as that user.
# useradd -m -d /opt/tomcat -U -s /bin/false tomcat
You’ll now install the JDK. First, update the package manager.
# apt updateThen, install the JDK
# apt install openjdk-17-jdk
# sudo update-alternatives --config java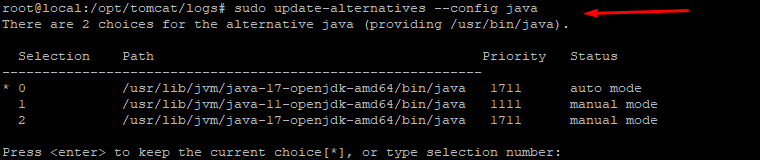
Once the installation is complete, check which version of Java is installed.
# java -version
To install Tomcat, you’ll need the latest Core Linux build for Tomcat.
# wget https://dlcdn.apache.org/tomcat/tomcat-11/v11.0.2/bin/apache-tomcat-11.0.2.tar.gz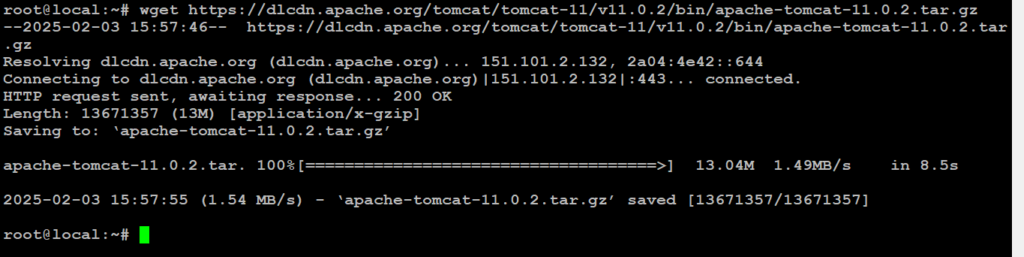
Extract the archive
# tar xzvf apache-tomcat-11.0.2.tar.gz -C /opt/tomcat/ --strip-components=1Since you’ve already created a user, you can now give Tomcat ownership of the extracted installation by running the following command.
# chown -R tomcat:tomcat /opt/tomcat/
# chmod -R u+x /opt/tomcat/bin/
Configuring Admin Users
To access the Manager and Host Manager pages in Tomcat, you need to set up privileged users in the configuration. By default, Tomcat restricts external IP addresses from accessing these pages, so you’ll also need to remove those restrictions.
To do this, open the tomcat-users.xml file.
# vim /opt/tomcat/conf/tomcat-users.xml

<role rolename="manager-gui" />
<user username="manager" password="manager@123" roles="manager-gui" />

<role rolename="admin-gui" />
<user username="admin" password="admin@123" roles="manager-gui,admin-gui" />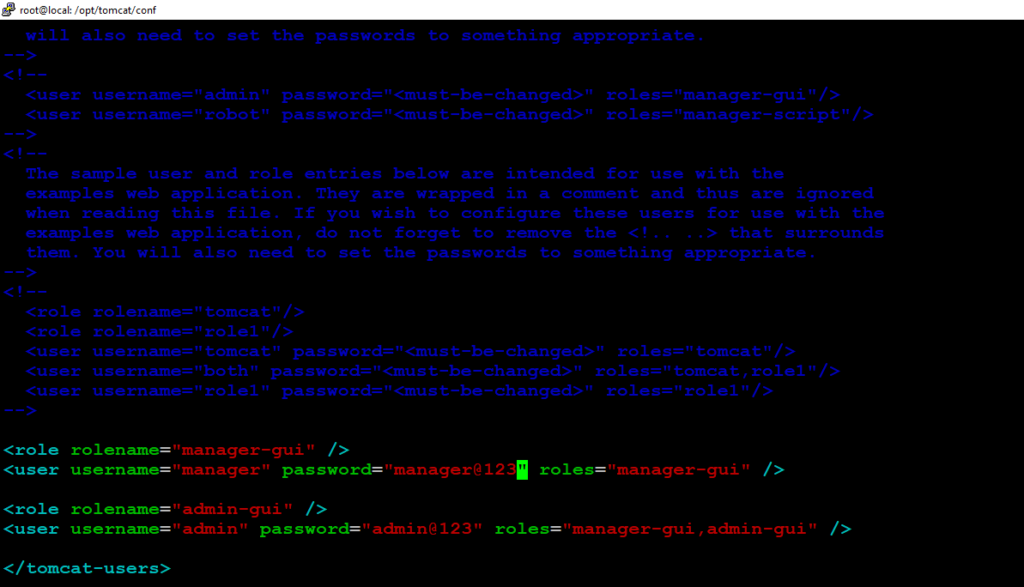
After saving and closing the file, you’ve successfully defined two user roles: manager-gui and admin-gui. These roles grant access to the Manager and Host Manager pages, respectively. Additionally, you’ve created two users, manager and admin, assigning them the appropriate roles.
By default, Tomcat restricts access to admin pages unless the request comes from the server itself. To allow access for the users you just created, you’ll need to update the configuration files for those pages.
To remove the restriction for the Manager page, open its configuration file for editing.
# vim /opt/tomcat/webapps/manager/META-INF/context.xml

<!--  <Valve className="org.apache.catalina.valves.RemoteAddrValve"
  allow="127\.\d+\.\d+\.\d+|::1|0:0:0:0:0:0:0:1" /> -->
Comment out the Valve definition.

Save and close the file, then repeat for Host Manager.
# vim /opt/tomcat/webapps/host-manager/META-INF/context.xml

<!--  <Valve className="org.apache.catalina.valves.RemoteAddrValve"
  allow="127\.\d+\.\d+\.\d+|::1|0:0:0:0:0:0:0:1" /> -->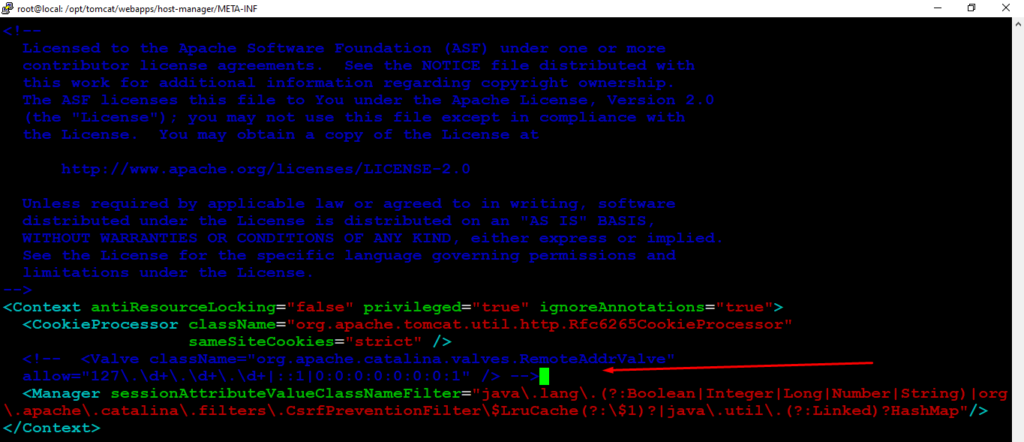
You’ve now set up two users, manager and admin, who will later be used to access restricted sections of the management interface. Next, you’ll create a systemd service for Tomcat.
Creating a systemd service
To ensure Tomcat runs smoothly in the background, you’ll create a systemd service that keeps it running quietly and automatically restarts it in case of an error or failure.
Since Tomcat is a Java-based application, it requires the Java runtime, which you installed earlier with the JDK. Before setting up the service, you’ll need to determine where Java is located. You can find this by running the following command:
# sudo update-java-alternatives -l
Take note of the path where Java is located—it’s listed in the last column. You’ll need this path shortly to define the service.
Next, you’ll create a service file for Tomcat named tomcat.service under /etc/systemd/system/. To begin editing the file, run the following command:
# vim /etc/systemd/system/tomcat.service

[Unit]
Description=Tomcat
After=network.target

[Service]
Type=forking

User=tomcat
Group=tomcat

Environment="JAVA_HOME=/usr/lib/jvm/java-1.17.0-openjdk-amd64"
Environment="JAVA_OPTS=-Djava.security.egd=file:///dev/urandom"
Environment="CATALINA_BASE=/opt/tomcat"
Environment="CATALINA_HOME=/opt/tomcat"
Environment="CATALINA_PID=/opt/tomcat/temp/tomcat.pid"
Environment="CATALINA_OPTS=-Xms512M -Xmx1024M -server -XX:+UseParallelGC"

ExecStart=/opt/tomcat/bin/startup.sh
ExecStop=/opt/tomcat/bin/shutdown.sh

RestartSec=10
Restart=always

[Install]
WantedBy=multi-user.target
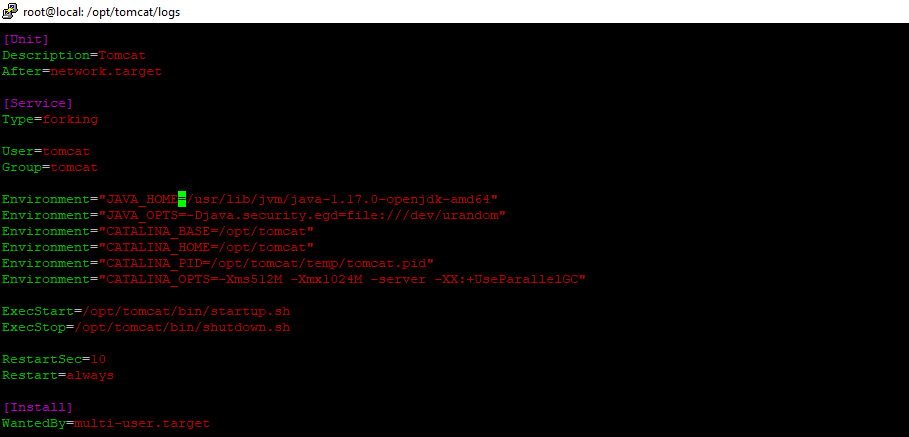
If the JAVA_HOME value is different from what you noted earlier, update it accordingly.
In this step, you’re setting up a service to run Tomcat using its built-in startup and shutdown scripts. You’ll also define a few environment variables:
- TOMCAT_HOME: Specifies the home directory for Tomcat (/opt/tomcat, as before).
- CATALINA_OPTS: Limits the amount of memory the Java Virtual Machine (JVM) can allocate.
Additionally, if the Tomcat service encounters a failure, it will restart automatically.
Once you’ve made the necessary changes, save and close the file.
Reload the systemd daemon
# systemctl daemon-reloadTo enable Tomcat starting up with the system
# systemctl start tomcat
# systemctl status tomcat
# systemctl enable tomcat
You’ve located where Java is installed and set up systemd to keep Tomcat running in the background. Now, it’s time to access Tomcat through your web browser.
Accessing the Web Interface
Now that the Tomcat service is up and running, you need to configure the firewall to allow connections. This will enable you to access its web interface.
Since Tomcat listens on port 8080 for HTTP requests, run the following command to allow traffic through that port:
# ufw allow 8080You can now access Tomcat in your web browser by entering your server’s IP address.
# http://your_server_ip:8080
# http://192.168.0.104:8080/
You’ll see the default Tomcat welcome page:

You’ve successfully verified that the Tomcat service is running.
Now, click on the Manager App button on the right. When prompted, enter the credentials you set up earlier.
If everything is working correctly, you should see a page that looks like this:

The Web Application Manager is your go-to tool for managing Java applications. With it, you can easily start, stop, reload, deploy, and undeploy your apps. Plus, you can run diagnostics to spot issues like memory leaks. For details about your server, just scroll to the bottom of the page.
Now, let’s explore the Host Manager. You can find it by clicking the button on the main page.
