
How to install Samba Based Active Directory on Ubuntu 22.04
Samba is a free open-source software that enables interoperability between Windows and Linux/Unix systems. It can function as a file and print server using SMB/CIFS, or serve as an Active Directory Domain Controller or Domain Member. Samba 4 supports emulation of Windows 2008 R2 domain and forest levels.
DC Server Setup
Set the Server Hostname
# hostnamectl set-hostame dac1
Add Server to Hosts File
# vim /etc/hosts
192.168.1.15 dc1.bitscentric.com dc1
Verify Hostname
# hostname -f
# ping -c3 dc1
Disable the DNS Resolver
Disable the DNS Resolver and unlink the config
# stop and disable systemd-resolved service
sudo systemctl disable --now systemd-resolved

# remove the symlink file /etc/resolv.conf
sudo unlink /etc/resolv.conf
Create our own Resolv.conf
# touch /etc/resolv.confEdit the following into /etc/resolv.conf
# vim /etc/resolv.conf
# Samba server IP address
nameserver 192.168.1.15

# fallback resolver
nameserver 9.9.9.9

# main domain for Samba
search dc1.bitscentric.com
Make the file immutable
To prevent any unintended modifications, we set the file to immutable, ensuring that nothing can alter it.
# sudo chattr +i /etc/resolv.confInstalling Samba
# sudo apt update
# sudo apt install -y acl attr samba samba-dsdb-modules samba-vfs-modules smbclient winbind libpam-winbind libnss-winbind libpam-krb5 krb5-config krb5-user dnsutils chrony net-tools
Enter the appropriate info
# Default Kerberos Verion 5 Realm:
BITSCENTRIC.COM

# Kerberos Servers for your realm:
dc1.bitscentric.com

# Adminitraive server for your Kerberos realm:
dc1.bitscentric.com
Disable Samba Services
# sudo systemctl disable --now smbd nmbd winbindActivate samba-ad-dc
# sudo systemctl unmask samba-ad-dc
# sudo systemctl enable samba-ad-dc
# sudo systemctl status samba-ad-dc
Configuring Samba Active Directory
First we backup the original smb.conf file
# sudo mv /etc/samba/smb.conf /etc/samba/smb.conf.backupProvision the Active Directory
# sudo samba-tool domain provisionEnter the following info
- On Realm prompte – <Enter>
- On Domian Promp – <Enter>
- On Server Roll – <Enter>
- On DNS Backend – <Enter>
- DNS Forwarding IP – 8.8.8.8
- Enter an Admin Password


Backup and replace the Kerberos Config
# sudo mv /etc/krb5.conf /etc/krb5.conf.backup
# sudo cp /var/lib/samba/private/krb5.conf /etc/krb5.conf
Start samba-ad-dc
# sudo systemctl start samba-ad-dc
# sudo systemctl status samba-ad-dc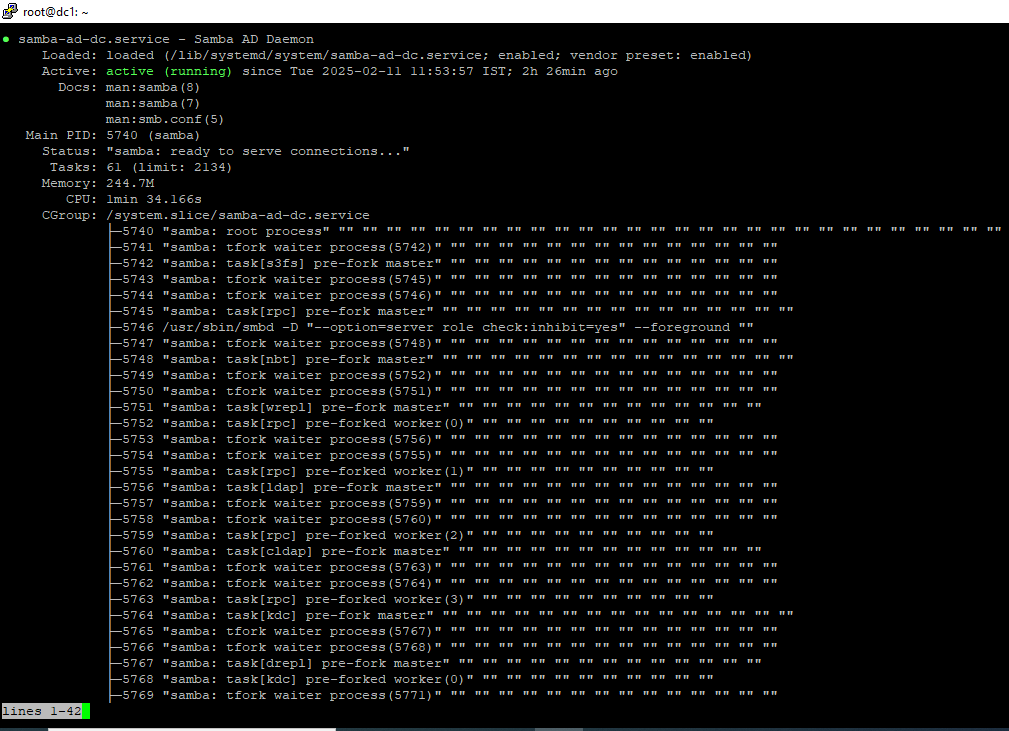
Set up Time Synchronization
# sudo chown root:_chrony /var/lib/samba/ntp_signd/
# sudo chmod 750 /var/lib/samba/ntp_signd/
Update Chrony
add the following to /etc/chrony/chrony.conf
# vim /etc/chrony/chrony.conf
bindcmdaddress 192.168.1.15
allow 192.168.1.1
ntpsigndsocket /var/lib/samba/ntp_signd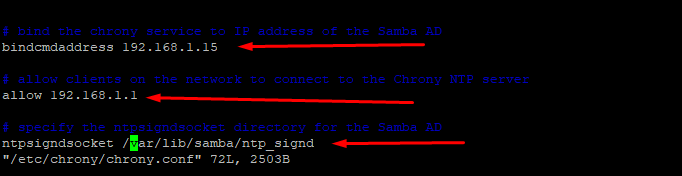
Then restart Chrony and get it’s status
# sudo systemctl restart chronyd
# sudo systemctl status chronyd
Verifying Samba Active Directory
# host -t A bitscentric.com
# host -t A dc1.bitscentric.com
Then verify the Kerberos and ldap services
# host -t SRV _kerberos._udp.bitscentric.com
# host -t SRV _ldap._tcp.bitscentric.com
Last KINIT setup
# kinit administrator@BITSCENTRIC.COM
# klist
Completely install Samba-based Active Directory.
Create your first user
This is optional because using the Remote Server Administration Tools (RSAT) on Windows gives you more flexibility when adding a user.
# sudo samba-tool user create user1
# sudo samba-tool user list