
How to Install Nginx on RHEL
Nginx (pronounced “engine-ex”) is a popular web server software that helps deliver websites and web applications to users. Think of it like a very efficient traffic controller for the internet. It manages incoming requests from users, decides how to handle them, and then sends the appropriate response, whether it’s loading a webpage, providing data from a server, or handling other services.
Nginx is known for being lightweight and fast, making it an excellent choice for handling a lot of visitors at once. It’s often used for serving static content (like images, videos, or web pages), but it can also act as a reverse proxy (sending requests to other servers) or load balancer (distributing requests to different servers to avoid overloading one). It’s highly flexible and can be used for a variety of tasks beyond just serving websites.
Nginx is quickly becoming the fastest-growing web server for public internet-facing servers. This is thanks to its open-source, modular design, high performance, and stability. It also stands out for its simple configuration files, event-driven (asynchronous) architecture, and low resource requirements, making it an efficient choice for many.
Install NGINX Using Yum Repository
# yum install yum-utilsTo set up the yum repository, create the file named /etc/yum.repos.d/nginx.repo
vim /etc/yum.repos.d/nginx.repo

[nginx-stable]
name=nginx stable repo
baseurl=http://nginx.org/packages/centos/$releasever/$basearch/
gpgcheck=1
enabled=1
gpgkey=https://nginx.org/keys/nginx_signing.key
module_hotfixes=true

[nginx-mainline]
name=nginx mainline repo
baseurl=http://nginx.org/packages/mainline/centos/$releasever/$basearch/
gpgcheck=1
enabled=0
gpgkey=https://nginx.org/keys/nginx_signing.key
module_hotfixes=true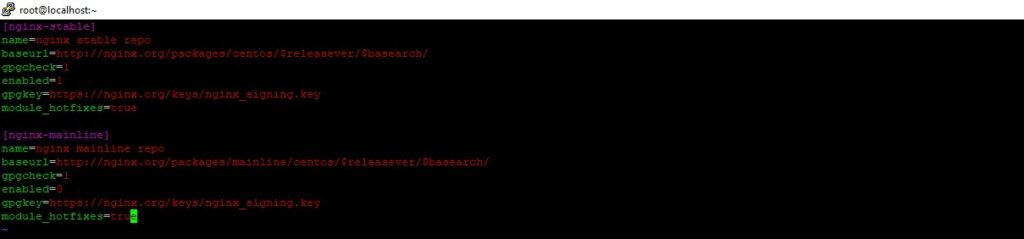
By default, the repository for stable nginx packages is used. If you would like to use mainline nginx packages, run the following command:
# yum-config-manager --enable nginx-mainlineNow, you can install and update nginx from the repository.
# yum install nginx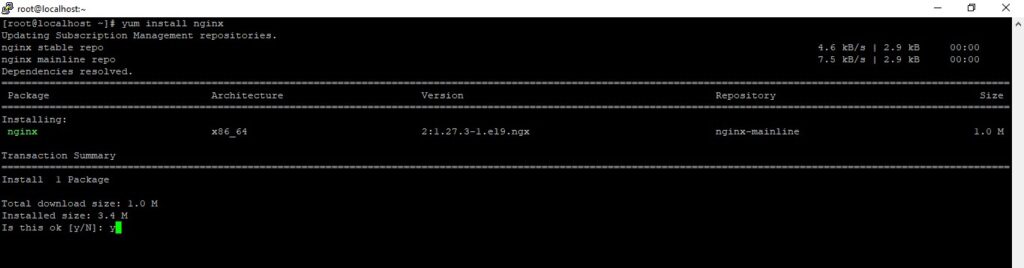
After the installation is finished, run the following commands to enable and start the web server
# systemctl start nginx
# systemctl enable nginx
# systemctl status nginx
Now, open any Web Browser and search your hostname or ip address of your server to verify nginx is working or not
# http://your_domain_or_IP or
# http://192.168.1.16/
Important Nginx Directories and Files
1. Content Directory
- /usr/share/nginx/html: This is where the actual web content is stored. By default, it contains the default Nginx welcome page. You can change this directory to serve your own content by modifying the Nginx configuration files.
2. Server Configuration
- /etc/nginx: This is the main directory for Nginx configuration files.
- /etc/nginx/nginx.conf: The primary configuration file for Nginx. You can edit this to adjust global settings for your Nginx server.
- /etc/nginx/conf.d/: This folder holds additional configuration files, typically used for individual server blocks (virtual hosts). Each website you host can have its own configuration file, often named after the domain (e.g., your_domain.conf).
3. Server Logs
- /var/log/nginx/access.log: Logs all incoming requests to your web server. This helps you track traffic and usage.
- /var/log/nginx/error.log: Records any errors or issues Nginx encounters, useful for troubleshooting.
Now we are ready to configure the site to host one or more domains.
When using Nginx on RHEL 9, you can organize your configurations and host multiple domains on a single server using server blocks (similar to Apache’s virtual hosts). These server blocks are defined in .conf files located in the /etc/nginx/conf.d directory.
For this setup, we’ll create a server block for a domain called your_domain. Remember to replace your_domain with your actual domain name.
By default, Nginx on RHEL 9 serves files from the /usr/share/nginx/html directory. While this setup works for a single site, it can become difficult to manage when hosting multiple websites. Instead of modifying the default directory, you’ll create a separate directory structure for your your_domain website within /var/www. This way, /usr/share/nginx/html remains as the default directory for any requests that don’t match a specific site.
Create the directory for your_domain as follows
# cd /var/www/
# mkdir demo.com
Next, assign ownership of the directory
# chown -R nginx:nginx /var/www/demo.com/
Change the permission
# chmod -R 755 /var/www/demo.com/
To set up your server with a custom web root, you’ll need to create a new server block. This involves adding a configuration file at /etc/nginx/conf.d/your_domain.conf. Inside this file, you will specify the directives that point to your custom web root location.
# cd /etc/nginx/conf.d/
# vim demo.com.conf